
Authentication - Web Api App for AX 2012 to Azure-part 3

Lets set up the authentication in this post. You should always secure your application and never leave it exposed out to the web.

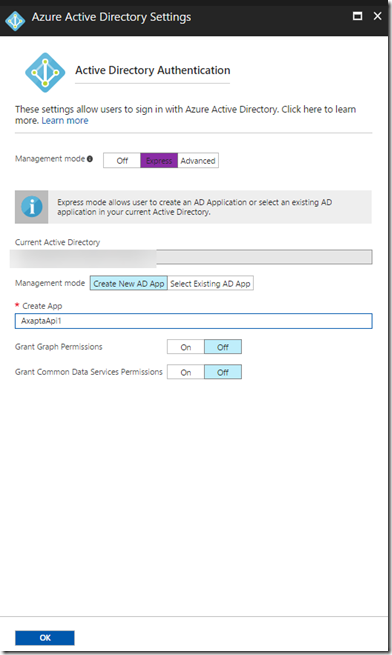
Click on Authentication menu and turn it on. In the drop down, select Azure Active Directory. In the Authentication providers click on Azure Active Directory to start configuring it.

image

Select the Express mode. This will create an web App registration.
image

Once authentication is configured. Lets set up a native Application registration. This step is only required if you are trying to communicate to the web service via a desktop applications, mobile application, third party tools to access your web services.

More information on application permissions and authentication on the Microsoft article.

https://docs.microsoft.com/en-au/azure/active-directory/develop/active-directory-authentication-scenarios

Navigate the the Active directory menu and click on Application permissions. You will see the “Web app/API” application registration. We will create a Native application registration.

image

When creating it you will be asked to enter a redirect URI. Enter a valid uri.

image

Click on the Native application registration and click on Required permissions. Add the Web App registration and Grant permissions (button at the top).

image

When you are adding it. You will have to search for it. It wont show up on the list automatically.

image

We are done.


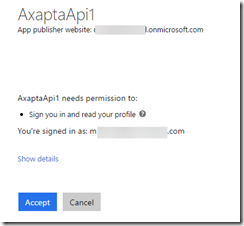
Now lets test it by navigating to the swagger url. You will be asked to log in and also accept permissions.
image

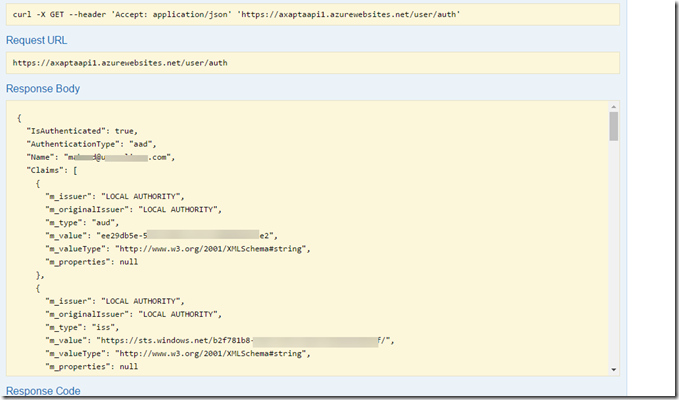
There is a test service you can run to check that it has recognised you.
image

Popular posts from this blog

Approve Workflow via email using template placeholders #Dyn365FO

Dynamics 365 for Finance and Operations has placeholders which can be inserted into the instructions. Normally you would want this to show up in the email that is sent. One of the most useful ones is the URL link to the exact record that you are approving. In the workflow configurations use the placeholder and build up your message. Towards the end it has workflow specific ones. The URL token is %Workflow.Link to web% . For the technical people the token is replaced in this class WorkflowDocumentField. This is what I inserted into my email template. <BODY> subject: %subject% <BR> message: %message% <BR> company: %company% <BR> for: %for% <BR> </BODY> Should look like this. The final result looks like this. If you debug these are the place holders that are put together.

Purchase requisition – Price

The price fields on the purchase requisition are non-editable for catalogue items. It is expected that a trade agreement be created. The price fields are only editable for these conditions: Form is opened view AP -> Periodic -> Purchase Requisition -> All purchase requisition, or Line type is “Non-catalogue item”, or User is task owner. Ie. The task is assigned to the user. In other words he/she maybe the purchaser that gets the price. User is approval owner. Ie. The approval is assigned to the user. In other words he/she maybe the manager that approves the final requisition. For catalogue items on the purchase requisition line can only select between the vendor directly associated with the item and the cheapest vendor as found through the purchase price trade agreements. If another vendor is requested the vendor can be blanked and the user can enter a “Proposed vendor” in the proposed vendor field on the general tab page for the purchase requisition line.   NOTE: ...

Dynamics 365 Invoice Capture Feature

Microsoft recently released the new Invoice Capture for Dynamics 365 Finance. I ran through installing and configuring it.  From that experience, below is my brain dump and hopefully it can help with things that are not so obvious. Three type of invoice captures There are three invoice type paths that can be captured. These drive the screen layout and what kind of information is mandatory. PO invoice Header-only Cost invoice When an invoice comes in, you can select one of the three invoice types. Below are the three screen layouts and differences. PO invoice – Invoices of this type are associated with purchase orders. The purchase order details must be determined on each invoice line. Both the header and the lines must be reviewed in Invoice capture. This will create a pending vendor invoice. Header-only – Invoices of this type are associated with purchase orders. The purchase order field on the invoice header is a mandatory field. If the Automatically create invoice lines featur...