Microsoft Flow is a simple and cost effective way of integrating. In this post I will walk through how to use Flow for recurring file integration. The most common scenario I can think of is the general journal import.
First, I would recommend reading Microsoft article on recurring integration.
Solution below shows you how to use Microsoft Flow to read from OneDrive for Business and import to FinOps. The exact same thing can be done using Logic Apps for a more enterprise managed solution.
Lets start by setting up our folder structure to drop our general journal files in. Create four folders like so:
- inbound – drop the files here to be processed
- processing – Flow will move the file here from the inbound folder while executing
- success – Flow will move it here when the file has successfully been imported and processed
- error – Flow will move it here if the file fails to process for any reason
Now in Microsoft Flow designer, place a “When a file is created” and select the inbound folder.
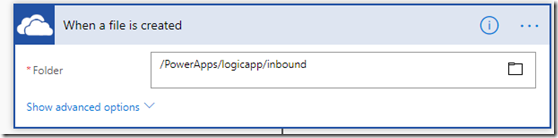
In the next step, I used “Initialize variables” to be able to quickly change settings later in the flow. Otherwise, it can get messy to maintain and move around.
You might ask why I used an Object type rather than a String. In a string, I can set a single variable only. However, with the object I used a json string which allows me to set up multiple variables. (Let me know if this can be in a better way)

I parsed the json string. You can do this easily by copying the json string from above. Then click “Use sample payload to generate schema” to paste it in. It will generate the schema for you.

Next two steps is moving the file from inbound folder to processing folder. However OneDrive for Business doesn't have a Move action. I had to use a Create and Delete action as two steps. If you are using OneDrive for personal you will see a Move file action.
Once its moved, I use “Get file content” action to read the file.

Next, I used an HTTP POST action to send to the enqueue the file. I use the variables that were initialized earlier.
In the header I am setting the external identifier as the name of the file. This is done so in FinOps we can identify the job by the name.

This is what the result looks like in FinOps.

We are done sending the file to FinOps. The next steps are doing some cleaning of the file by moving to the success or error folder. Or you can email someone when a file is process or it errors out. You can get fancy.
However, I will show an example what you can do. Below I check every minute for 60 minutes if the job has been processed in FinOps. You can change the interval.
I added a “Do until” action. This is a loop that executes at an interval for a time limit.

The advanced query from the above is pasted below for your convenience. Its just doing an “or” condition. It checks if it is in any of these states.
@or(
equals(body('HTTP_2')?['DataJobStatus']?['DataJobState'], 'Processed'),
equals(body('HTTP_2')?['DataJobStatus']?['DataJobState'], 'ProcessedWithErrors'),
equals(body('HTTP_2')?['DataJobStatus']?['DataJobState'], 'PostProcessingError'),
equals(body('HTTP_2')?['DataJobStatus']?['DataJobState'], 'PreProcessingError')
)
Initially it gets Queued, In Process and will go to Processed if it is successful.
All the statuses are listed here:
Next, I added a Condition to check the job status. If it is Processed, then I know it is successful. I can then move the file to the success folder. Otherwise, to the error folder.

I will stop here as the next few stops are pretty much a repeat of moving a file in OneDrive.
Why don’t you take it to the next level and check out Ludwig’s blog post on automating the posting of the general journal.
https://dynamicsax-fico.com/2016/08/17/automatic-posting-of-journals/