
Integration - Create a lead in CRM via a web service in 10 minutes

CRM (Microsoft Dynamics Online – not AX CRM) has an SDK which you could use to integrate to. It can been overwhelming sometimes. So, I decided to use Flow to do the communication for me (HTTP Request > Dynamics). Took me 10 minutes from start to finish.

I didn’t have to learn the CRM SDK or figure out how to do authentication etc. I wanted to send a simple json message like this.

{
     "Email": "munib@fakeemail.com",
     "FirstName": "Munib",
     "LastName": "Ahmed",
     "Topic": "Health"
}

Go to Flow and create a new HTTP request. Click on “Use sample payload to generate schema” and enter the above json message. It will generate a schema as per below screenshot. Take note of the HTTP POST URL that has been generated. We will use that later to send the message to.
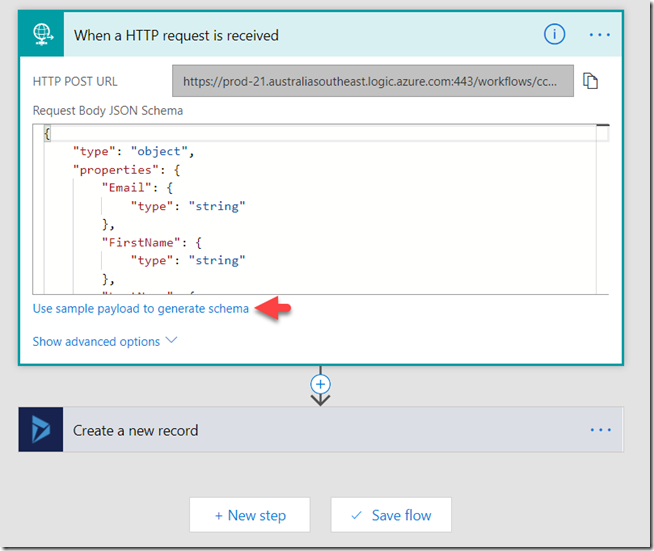
image

In the Actions select Dynamics > “Create a new record”. Select Leads as the entity name. Map the fields and you are done.

image

Now we just need to send a message to Flow using the URL. It doesn’t matter what tool you use to send a message. Below I used AX2012 (just because I had this job from a previous blog post I did).

image

Go to Flow Run history to see what has happened. Notice in the output – it looks like the message we sent.

image

We see the same in the creation. The mapping has worked.

image

Final result in CRM is the lead created. All my mapped fields look fine.

image

A word of caution. This is not a production ready solution. As you should consider security and your end to end architecture.

I did this as a proof of concept and wanted to show the power of Flow. Allowing me to integrate to another system that I didn’t have much knowledge of.

Popular posts from this blog

Approve Workflow via email using template placeholders #Dyn365FO

Dynamics 365 for Finance and Operations has placeholders which can be inserted into the instructions. Normally you would want this to show up in the email that is sent. One of the most useful ones is the URL link to the exact record that you are approving. In the workflow configurations use the placeholder and build up your message. Towards the end it has workflow specific ones. The URL token is %Workflow.Link to web% . For the technical people the token is replaced in this class WorkflowDocumentField. This is what I inserted into my email template. <BODY> subject: %subject% <BR> message: %message% <BR> company: %company% <BR> for: %for% <BR> </BODY> Should look like this. The final result looks like this. If you debug these are the place holders that are put together.

Purchase requisition – Price

The price fields on the purchase requisition are non-editable for catalogue items. It is expected that a trade agreement be created. The price fields are only editable for these conditions: Form is opened view AP -> Periodic -> Purchase Requisition -> All purchase requisition, or Line type is “Non-catalogue item”, or User is task owner. Ie. The task is assigned to the user. In other words he/she maybe the purchaser that gets the price. User is approval owner. Ie. The approval is assigned to the user. In other words he/she maybe the manager that approves the final requisition. For catalogue items on the purchase requisition line can only select between the vendor directly associated with the item and the cheapest vendor as found through the purchase price trade agreements. If another vendor is requested the vendor can be blanked and the user can enter a “Proposed vendor” in the proposed vendor field on the general tab page for the purchase requisition line.   NOTE: ...

Dynamics 365 Invoice Capture Feature

Microsoft recently released the new Invoice Capture for Dynamics 365 Finance. I ran through installing and configuring it.  From that experience, below is my brain dump and hopefully it can help with things that are not so obvious. Three type of invoice captures There are three invoice type paths that can be captured. These drive the screen layout and what kind of information is mandatory. PO invoice Header-only Cost invoice When an invoice comes in, you can select one of the three invoice types. Below are the three screen layouts and differences. PO invoice – Invoices of this type are associated with purchase orders. The purchase order details must be determined on each invoice line. Both the header and the lines must be reviewed in Invoice capture. This will create a pending vendor invoice. Header-only – Invoices of this type are associated with purchase orders. The purchase order field on the invoice header is a mandatory field. If the Automatically create invoice lines featur...