I recently saw a question on LinkedIn, asking if we can share our experience with moving to Git version control.
Here is a response to it. I will share my experience of moving to GitHub version control. We have chosen to move our X++ code to Git and in particular GitHub about 6 months ago.
Reasons for the move
Below are some of the reasons we have chosen to move from TFVC on Azure DevOps to Git on GitHub:
- Every single source code/project we have is on Git except for our X++ code. I have been asked way too many times as to why we are on TFVC. I have explained many times but I can't help shake the feeling that others think X++ is some old language. In other words, better alignment.
- There has been considerable effort to move to GitHub as our approved version control from many other version control systems. This is to make our code more accessible to all teams, have policies in place, leverage shared tooling, better manage onboarding experience etc.
- Better branching and merging experience
Architecture
Below is the architecture we have gone with.
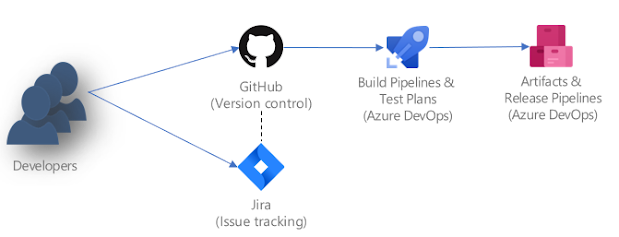
- Developers - we have multiple developers with their dedicated VM on our Azure subscription
- Jira - Our issue tracking (tasks, bugs etc) and any planning is done on Jira
- GitHub - Our version control where we keep our X++ source code, our pipeline code (yaml, powershell), postman collection
- Azure DevOps Build pipeline - we have chosen to have both forms of our build pipeline
- Build with Nuget via hosted agent - this is executed on every pull request to main to catch any merge issues that would result in a compile issue.
- Build via a build VM - this is executed in two various ways. Manually executed on demand when we wish to do a release and automatic at night when ever there is code change in main. We use the build VM because we have automated unit tests, automated RSAT runs and run CAR report that gets uploaded to the artifacts.
- Azure DevOps Release Pipelines - The release pipeline will take the deployable package and push to our test environment.
Repo
Here is the folder structure we keep in our repo. I am masking/obfuscating the names here and are to give you a general idea.
/pipelines
/pipelines/fo-nuget-build
/pipelines/payment-connector-build
/postman
/postman/*.postman_collection.json
/projects
/projects/*/*.sln and *.proj
/src
/src/Metadata/MyCustomModules
/src/PaymentConnector

A few things to note here:
- I could have moved the Postman and PaymentConnector into its own repos but I found it cleaner to have it together.
- .gitignore - I just used whats out there and found this one to be working well form me PaulHeisterkam/d365fo.blog/.gitignore
- Build status - you will notice the build status badges I placed int he main readme. This gives clear visibility into the health of our pipelines. One that happens from time to time is getting a warning on the RSAT pipeline. We do have emails going to our team if the build fails too.
Branching
Our branching strategy is to have very short lived branches.
- main - The main branch which has a policy requiring an approval from another developer. Only way to get anything in is via a pull request
- user/username/featurename - we like to place our dev branches under the developers (users) name. Easy to identify who is working on it and no one touches someone else's branch without communicating to them. Call it what ever you want, it can be called something generic like user/munib/dev. Its all yours and its all about creating frictionless development experience.
- feature/featurename - this is a feature branch that is shared across multiple developers. It usually a large development that we may not release for multiple sprints. Give it something meaningful. As I am posting this, there are no feature branches in my current repo.
Currently, we don't have multiple releases. Only a single stream of development. If we had multiple release streams, I would make the main be in sync with BAU stream of work. Then create a release branch eg. release/Phase2
Symbolic link
We are using these powershell scripts for our symbolic links and works really well.
Build and Release piplelines
I have attempted to use GitHub workflow actions but it was a fair bit of work. Azure DevOps pipelines work really well with GitHub and there are already tasks that I can utilise. Where as in GitHub Actions, I would have had to write powershell scripts.
Jira and GitHub
Jira integrates with GitHub really nicely. When ever we commit in Git and put the issue number, it will automatically link the code change to the Jira issue.

Release notes
We create release notes via Jira. This is done by tagging the fixed version to the release. Nothing sophisticated here to avoid confusion. The process is simple and doesn't take that much effort.
Git commands
I am not a Git command person. I use a combination of commands and UI tools. I have experimented with the below and I still use a combination of them.
- GitHub Desktop
- VS Code - with Git extensions installed
- Visual studio Git UI experience
- Git command line
My advice to any developers is, use what is comfortable to you.
Onboarding developers
This is probably the biggest challenge in most companies. FinOps developers are so used to TFVC and its implicitly. Our daily ritual is Get latest, do some coding and checkin.
One way to overcome this is a good clean readme page. Simple instructions on how to get started. Assign a simple development task and walk them through it.
Then the new ritual will be something like this
git checkout main
git fetch
git pull
git merge users/munib/dev main
git checkout users/munib/dev
Just build up slowly to more complex scenarios.
References
These links are super helpful